Sunday, December 30, 2018

New Year - New Challenges - New Possibilities


Submitted by Keith Bridgman

2018 was an eventful year for Sunny 16 with numerous outings attended by most of the members. Wonderful and informative lectures from guest speakers enlightened all. Small breakout groups were assembled to explore various avenues of photography and each of them were well attended, and members provided numerous video programs to showcase their efforts. We had award winners and exciting exhibits. We learned from, supported, and enjoyed each others company, and sadly, we lost one of our own. Rest in Peace Hack...you are missed.

2019 looms ahead of us and with its approach new challenges will dangle like the proverbial carrot on a stick in front of us. Projects are planned or are in their early stages of development and the club will once again take cameras in hand to explore what possibilities await us. I hope each of us takes time to reflect on the past year and contemplate what the new year might offer.

Photography is a creative activity and each of us possess a desire to express how we see nature and the world in general. We have residing within us a restless feeling...a feeling that drives us to see the world through a different set of eyes and to capture extraordinary visions of what we see. That restless drive guides us forward everyday to try new things and to perfect what we already know. How much we learn, how we grow as photographers and artists, is buoyed by this drive from within and uplifted by the encouragement we receive from our fellow club members.

I hope every club member will explore the new challenges and possibilities of the new year. We can create and share extraordinary images from our lives. I am excited to witness the new possibilities

Monday, December 17, 2018

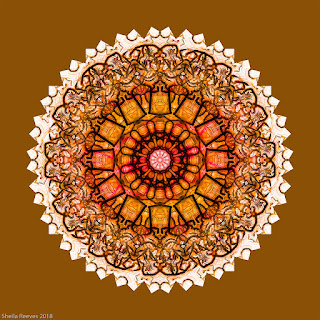
How to Make a Kaleidoscope Pattern from Your Image

Submitted By Sheila Reeves


There is more to photography than simply taking pictures. Post processing can become an exciting and creative tool to transform your images into works of art. Sheila Reeves shares with us her process to create Kaleidoscope Patterns from images. Give it a try...I believe you will discover a new world filled with artistic flavors.


Part 1:

     Select a photograph. Images with bold, contrasting colors and negative space work well.

      Open your image in Photoshop

      Right click on the image in the layers panel, and select Convert to Smart Object.


     Add space around the image:

     Go to Image > Canvas Size.
     Set the length and width to be at least 1” larger than two times the current value for the long side.
     Then zoom out so you see the entire canvas on your screen.


     Use the Move Tool to drag your photo toward the upper left edge of the canvas, leaving a little blank space at the top and on the right.


     Duplicate your image by right clicking it in the layers panel and selecting Duplicate Layer (or use shortcut Ctrl+J or Cmd+J).

     Rename this layer as Layer 1.

     Use the Move Tool to drag Layer 1 to the right so it lines up with, and touches the original layer.


     Keeping Layer 1 selected, click Edit > Transform > Flip Horizontal.


     Select the original image (Layer 0) and duplicate it again. Rename this new layer as Layer 2.


     Use the Move Tool to drag Layer 2 down and left so it lines up with, and touches the original layer.


     Keeping Layer 2 selected, click Edit > Transform > Flip Vertical.


     Select Layer 0 and duplicate it again. Rename this new layer as Layer 3.


     Use the Move Tool to drag Layer 3 down and to the right so it completes a rectangle.


     Keeping Layer 3 selected, click Edit > Transform > Flip Horizontal. Then click Edit > Transform > Flip Vertical.


     The next step is to merge the layers of the rectangle you have made so it can be moved around as one layer: Right-click on Layer 0 in the layers panel and select Merge Visible. With the Move Tool selected, drag the layer into the center of the canvas. Decide on a rotation angle – any number that can be divided evenly in 360. The smaller the angle, the more complex the kaleidoscope. I like to use 15.

        Part 2:

     Duplicate the layer. Rename the layer with a number 1 greater than highest layer number. (Layer 1, Layer 2, etc.)

     Make sure you have selected the layer you just created. Click Edit > Transform > Rotate.

The Transform settings panel is at the top of the screen. In the box next to the symbol of an angle, enter your rotation angle value, and press enter. Then select the check mark box to apply this rotation.

Repeat steps 16-18 until you have completed your kaleidoscope. The number of layers you create will depend on the angle of rotation you choose.

                                    45 degrees à layers 0-3
                                    30 degrees à layers 0-5
                                    15 degrees à layers 0-11
                                    10 degrees à layers 0-17

      Part 3:


Now you need to blend the layers together:
Select all layers except layer 0 in the layers panel by holding down the shift key and clicking on layer 1 and the highest number layer. With the layers selected, click on the Blending Mode drop down menu (it should say normal) and select the Lighten Option. You may want to try different blend modes and see which one you like best.

Finally, crop the image to clean up jagged edges and do any other editing you wish to do.


     Save your Kaleidoscope via File > Save As.

Saturday, December 15, 2018

Sunny 16 Volunteers for HELP Portrait Again

Seven years running now members of the Sunny 16 Camera Club spent another day, December 15, 2018 taking family portraits for HELP Portrait. Help portrait provides family portraits to low income families in our community. Many of these families have never had a family portrait made because of the cost. This years event was again located at The Foundry in Bowling Green. Many thanks to them for providing us with a great location.


Sunny 16 provided free of charge an 8x10 framed print to all families who came to the event. We also took numerous photo's with Santa and Mrs Claus for the families again this year.


Thanks to all the volunteers for taking time out of their day to provide support for this project. The laughter, the smiles, the gratitude of the families were shared across the board and all of us who participated received a great deal more in return seeing their eyes light up when they received their photos.


Please enjoy these few behind the scenes photos of the team participating in today's event. A great deal of technical support was required...computer setups, photo editors, printers, photographers, framers, plus many who provided activities for the kids while they waited for their prints.

Good Job Sunny 16...Well Done!


Wednesday, December 12, 2018

2018 Club Christmas Dinner

It was a festive and fun evening of good food, fellowship, and winning prizes! The Sunny 16 Club members showed up in great numbers at our annual Christmas dinner. Plenty of laughs were shared, we all stuffed ourselves with a great pot luck dinner, and we spent time having fun just hanging out without a camera around our necks. Here's a few photos provided by Janet Young of this fun evening.


Thanx to all who came, to all of our wonderful sponsors for the great gifts...we gave away over $1000 worth of good stuff...and Merry Christmas to all. Can't wait for a new year of exciting photography adventures.

Friday, December 7, 2018

Celebration of the Arts

The Kentucky Museum invites professional as well as amateur artists to enter its Celebration of the Arts competition.

Age 18 and above
Residing in Kentucky within a 65-mile radius of Bowling Green
All work will be exhibited at the Kentucky Museum from March 2 through April 5
Works are judged with awards given in eight categories


Exhibition Schedule


February 8 Deadline for entry

February 15, 9am - 7pm Hand-delivered work due


March 1, 6 - 8pm Opening reception, awards presented at 7 pm

March 2 - April 5 Exhibit during museum hours: Tuesday - Saturday, 9am - 4pm

April 6, 10am - 5pm Artwork Pickup

Click on Link for more information.

Celebration of the Arts


Wednesday, December 5, 2018

Defining a Photograph - 4 Elements of Convergence

Submitted by Keith Bridgman

Every photographer is different in the way they see and capture the world around them. We all have our likes and dislikes and we all possess varying degrees of insight along with the ability to visually compose the images we capture. Sometimes I will instinctively take a photo and not until later when I begin to look at the image do I see the reasons why it was composed the way it was.


When I first took a closer look at this particular image it looked rather ordinary and not at all like what my minds eye would normally reflect. It is an image taken on the Tallgrass Prairie some years ago and the more I studied the image the more I began to understand the justifications of its composition. What I saw was how instinctively the concept of Convergences was applied to the theme of the image.

Convergence when applied to a photograph means the separations of key elements and how they influence the overall strength of the image. What stands out in this photograph are four elements.

The first element is the sky. The upper left appears dark and foreboding while the lower right appears lighter and more delicate. The two sections are separated by the wispy layer of clouds that angle across the center section with dark elements on the upper left and lighter reflections on the lower right. It represents a good separation of the bold from the more delicate portion of the sky. Without the clouds, the sky would be ordinary and have less influence on the outcome of the image.

The second element is very subtle and almost a non-element yet it defines a key component, the distant horizon. I'm talking about that sliver of straight line in the lower right that defines the separation from the sky and the prairie horizon. It's very small, yet definitely there and serves an important purpose to identify this location as part of larger expanse of landscape.

The third element is the arch of the landscape across the bottom third of the image. Along its top edge you can see random selections of grass extending above the ground to touch the sky above. Without these grass clumps rising above the horizontal arch line, the composition would lose depth and look rather flat. The grass extending into the sky gives the image a sense of place, a feeling of standing in a big open expanse. The large rock near the center is the eye catcher element and it too extends above the arch horizon as well thus adding even more depth and a solid foundation to the composition by becoming the fulcrum high point of the arch. With it being slightly offset, it serves to balance the image against the other elements. The low angle of the morning light also creates dramatic shadowing and highlights on the grassy elements adding more depth.

The fourth and final element includes that single stalk of a white plant on the left...probably an evasive Queen-Annes Lace plant...that stands out against the darker gray background. It is part of the larger expanse of grasses themselves who have elements of lighter and darker textures. That one element helps to bring the image forward toward the viewers eye and adds a 3-dimensional element to the composition.

Three layers can be observed across this arch; the distant horizon on the right, the arch against the sky, and the forward frontal element of the white flower. Everything fits in place...there are no convergences that interfere with each other. Oddly enough, at the time the photo was taken, I probably wasn't even thinking in that context. Somehow, instinctively, it all lined up the way it should have. The fact that it was converted to Black and White with a subtle Sepia tone reduced the visual impact of the image to a more graphic look making the structural elements of the image more prominent.

Convergences can make or break a photograph. When they are properly placed, the image takes on a natural appeal. Seeing them while in the field takes practice and sometimes simple luck. Using and understanding them moves a photograph forward and creates a visual dialog that speaks to the viewer.

Tuesday, December 4, 2018

18 Things Highly Creative People Do Differently

(Submitted by Sheila Reeves)

This list comes from an article in Huffington Post. For the full artilcle, go to this link:


While there's no "typical" creative type, there are some tell-tale characteristics and behaviors of highly creative people. 

Here are 18 things they do differently.

 They daydream.
·        They work the hours that work for them.
·        They observe everything.
·        They take time for solitude.
·        They turn life's obstacles around.
·        They seek out new experiences.
·        They "fail up."
·        They ask the big questions.
·        They people-watch.
·        They take risks.
·        They view all of life as an opportunity for self-expression.
·        They follow their true passions.
·        They get out of their own heads.
·        They lose track of the time.
·        They surround themselves with beauty
      They connect the dots.
·        They constantly shake things up.
·        They make time for mindfulness.