Saturday, December 19, 2020

A Tip for Long Exposures

 Submitted by Sheila Reeves


You are standing in front of a beautiful scene with rippling water, moving colorful clouds and a great composition of hills and trees. You think to yourself, “This would make a great long exposure.” You attach an ND filter (maybe a 6 stop or 10 stop) to reduce the light entering your camera. You dial in a low ISO to avoid a noisy image. You think you will need about a 2 minute exposure, so you put your camera on bulb mode and take the picture keeping the shutter open for 2 minutes. Oh no! You calculated the exposure time wrong. The image is way too dark or way to light!

Well here is a tip to determine if you calculation is correct without having to wait those 2 minutes.

Change your ISO by 6 stops. If you are shooting at ISO 100, change it to 6400. That is six stops. If you are shooting at ISO 64, change is to 4000. 

Then substitute seconds for minutes of exposure time: 2 seconds for 2 minutes, 3 seconds for 3 minutes, 4.5 seconds for 4.5 minutes, etc. If that gives you a good exposure, reset your ISO and take the shot for the original exposure time. If it does not, you can adjust the time up or down to get a good exposure without having to wait minutes between attempts.


Sunday, November 8, 2020

What I See

Not much activity being posted on the club site as of late. COVID of course is mostly to blame, but neither have I made much of an effort to follow up on photo opportunities either of my own, or from others. As a result I searched thru some of my Beyond the Campfire posts and found this one from 2014. Thought it may be of some interest to the club members. Please, enjoy this slightly re-edited version of "What I See".

*********************************************************************************
Submitted by Keith Bridgman

Discovering a new way to observe the beauty that surrounds us can be an amazing revelation. Learning how to capture it photographically can be a challenge. Sharing it with others is the reward. This past summer (2014) I rediscovered the night sky and spent a great deal of time and energy learning how to not only observe it, but to capture it. It was a challenge that evolved into something much more than an exercise in technique or skill. It became a revelation of seeing.


I've often written about how photography is mostly about seeing light. But it is more than that really. It's about understanding what it is you see. There was a time I saw mechanically meaning I recognized the intrinsic value of what I was photographing, but failed to see beyond the superficial and cliche. Seeing photographically means to see through the superficial to find the solution.


More than likely previous efforts I placed on photographing the night sky may have seemed a bit over the top to most of my photography friends. A few of them gave it a try and then went on to other things that interested them more...and rightly so for them. I began to wonder why I was so captivated by that exercise. Night after night I would stand in some open field staring up at the night sky painstakingly adjusting the homemade tracking device I used to follow the stars across the field of view. Then later, after downloading the images and searching through the better ones I would spend time bringing out the best of what they were. Most of those images no one other than myself saw them, but that was okay. Because I wasn't taking them for someone else. I was taking them for me. 

What I saw was not just a night sky filled with stars and subtle colors of glowing dust along with nebula's filled with radiant gases. I saw a part of myself. In order to bring out the subtle nature of those glowing nebula's and radiant gases,  a long exposure was required along with patient and attentive tracking. When it all fell into place and that one moving image out of dozens materialized, well, a sense of satisfaction filled my heart. 

As a result I began to understand how that experience revealed a great deal about life. Everyone has subtle light in their lives that requires a long personal exposure along with careful and attentive tracking to see. 

With the right amount of effort and understanding, the light in their lives regardless of how faint, will over time begin to glow with it own unique radiance. When I smile as an image of the night sky begins to form, I am smiling because what I see is so much more than stars floating in the sky . . I see lives beginning to shine. 

Saturday, August 8, 2020

Get Low to Shoot High - Go Wide for Compositional Details

A photograph can convey almost every imaginable emotion from any number of perspectives. After all, that is what photography is all about, capturing the emotion of the moment. Too often though, we photographers tend to always work from eye level when in reality we should, a great deal of the time, elevate or drop our camera perspective. Oddly enough, changing our camera angle and perspective will often enhance the desired effect we visually desire, but sometimes fail to capture. Dropping the camera low will actually help us capture the sense of bigness and using a wide angle lens will help define important compositional details.

Take this image for instance. The camera was actually placed inside a shallow ditch so it would be at the lowest possible point in the composition. A somewhat of a wide angle lense, (18mm which has a crop factor of around 25mm), ( a 14mm would have been better), was employed to capture the bigness of the sky.


By tilting the lens upward and framing the fence posts against the sky, then including only a minimal amount of the ground, the fence post in essence takes on a more important element within the composition and acted like a pointer toward the sky. Had the camera position been at eye level, the post would have blended into the background and would not have provided such a dramatic representation. The important elements here were the sky and the fence. Going low allowed them to be given priority.

The waterfall photo used a similar approach. The camera was placed a few inches above the outflow stream that led back to the waterfall. By angling the camera toward the top of the falls, the lower perspective enhanced the tallness of the ravine and gave the falls priority over the ravine and used the flow of the stream as a pointer.

Using a wide angle lens also captured compositional details by using a perspective that leads the eye to the main subject. Details in this case was less about minute subtleties and more about enhancing the main subject.


The image of the guys is another example of how using a low perspective enhances the composition. I wanted the young men to look bigger than life, to give them an appearance of being in a dominant position, that sort of "Bond, James Bond" atmosphere. This pose would not have worked had it been taken at eye level. Also, there is a sense of leading lines here as well, and there is a degree of framing provided by the background trees.

That brings up another subtle point. Sometimes we forget to remember the background and how it affects the composition. Always be careful about what is called "Convergence" where elements within the composition cross and interconnect. Things like a tree limb coming out of a person's head can ruin an otherwise great image. A little bit of extra spacing obtained with a subtle movement of the camera angle will often solve an irritating convergence.


The idea then is to use camera angles that will provide a unique and interesting perspective as opposed to always shooting from eye level. Think about what you want the finished image to look like, then use a camera angle that will best generate that effect. Go low to enhance the tallness of something, and getting low while shooting wide captures compositional details that tell the story. A simple change of position can have a big impact on the effectiveness of a photograph.

Monday, July 20, 2020

Story Telling Inside a Photograph

Submitted by Keith Bridgman

While browsing through some of my older Beyond the Campfire blog posts, I ran across this one. No one else has submitted anything in while on the club Media Page, so I thought maybe it would be a good one to share. This single photo is one of my favorites for it captures a wonderful photo story and encompasses compositional elements of building a photograph that carries a strong storyline in such a way, viewers will reveal their own story within themselves. 

******************************************************************************

I walked somewhat sleepy-eyed along the gravel road, a road whose path wound its way toward an old country home tucked inside a gaggle of trees. It was late fall and the once dormant chill excited by a stiff wind engulfed the air surrounding me. The first light of the day was held in muted bondage by low hanging overcast that dipped close to the ground floating along pushed by the invisible hand of an approaching winter. The morning looked and felt gray. In the field to my left the rustic looking remnant of corn stubble stood as a testament to a successful harvest. On either side of the road an old fence row stood lined up like historic monuments to a time from the past.


About half way down the road a beam of the first light of the morning broke beneath the clouds and cast a cheerful glow across the home, the trees, and the tops of the the corn stubble setting the grass alight within the realm of the prevailing grayness. I positioned my tripod and camera composing the scene through the view finder, and released the shutter. A moment later the beam of light retreated back into the clouds and I was again alone standing on a country gravel road.

Photography is as much about telling a visual story as it is about capturing a moment in time. To capture a story one must first not only see what is there, but be able to feel the emotion of what surrounds you. It is the emotion of the moment that tells the photographer when to release the shutter and when you finally do, you instinctively know something unique and even amazing happened.

The visual story of a photograph may possibly be the most difficult element for a photographer to capture for it does not always willingly reveal itself. It is something you must seek out and to allow what is there to speak to your senses. Sometimes, it just happens. Most times it takes work and a willingness to turn off your other senses and allow your heart to grab hold of the story. Everyone must discover within themselves the necessary elements of how the world reveals such stories to them. It is not something that can be taught, only reminded. It is a personal reward well received, well worth sharing.

Wednesday, May 27, 2020

Looking for a Summer Photography Project? Try Woodscapes and Skyscapes

Submitted by Keith Bridgman

I'm always kicking off some kind of photo project. Most are rather simple and short lived and can be completed in a few days or maybe a few weeks, although, I have done year long projects and seemingly endless ones like photographing the Tallgrass Prairie. Summer of course is a great time of year to kick off a project or two. Two projects I plan on pursuing in more detail this season are Woodscapes and Skyscapes.


Woodscapes are possibly one of the more difficult of projects because of the nature of the light found inside a wooded area. Often high contrast lighting can play havoc with exposures, but also coming into play is clutter. Woodscapes are notorious for clutter. As a photographer shooting woodscapes you must constantly ask yourself..."what is my subject?" There are so many competing elements found within woodscapes it is difficult to isolate what is important and focus on creating the story you are emotionally experiencing.


Effectively reproducing what you are seeing as 3 dimensions into a 2 dimensional flat image can be quite a challenge. That is why shooting Woodscapes is such a good project because it forces you to look beyond the visual and focus on the emotional.


Color is also a problem because woodscapes tend to take on a single color tonality, especially during the summer when everything is green. Translating the story from within a monotone green perspective can present quite a challenge to the photographer. A good deal of the time I will often look for opportunities to translate the moment into a black and white image. This of course almost eliminates the monotone color issue but it does not always solve the clutter issue, but it does help.


Skyscapes on the other hand are much easier to shoot simply because of their scale. Summer days are often filled with a wide range of cloud formations, and clouds are what make skyscapes work. In fact you could probably substitute Cloudscapes for Skyscapes as a title.


The contrast of a blue sky and white clouds makes for a wonderful black and white translation. It is outside the scope of this post to detail the post processing techniques to convert a blue sky/white cloud photograph into a black and white photo. The idea however is to avoid blowing out the white portions and subduing the blue areas and creating a composition that is not only pleasing, but revealing. A polarizer filter goes a long ways to taming skyscapes.


This season  I hope to spend a lot of time shooting woodscapes and skyscapes. With any luck at all I might even be able to create a timelapse video event as well. Give it a try this season and enjoy the great outdoors in the process.


Tuesday, May 19, 2020

Introducing Duchess Grey at Nine Days Old!

Submitted by Theresa Smith

Proud Parents: Princess and Reverend Grey


I was invited to a friend’s alpaca farm to photograph their new cria (baby alpaca). I agreed and was very excited to see and photograph the new cria. When photographing alpacas, you must be patient, they like to huddle together in a herd which makes it a little difficult to photograph them. Watch closely for them to move farther apart from each other and when the moment is right, you’ll have an opportunity to capture a special image. 


Try to get the alpaca to put it’s ears up and look alert, this makes for a more pleasing image. Duchess Grey was very small so I got down to her level to photograph her. I took my portable garden seat with me to the shoot so I could sit, observe and photograph her from her height. The alpaca farm had pretty white fences and yellow flowers in the field so this made for a good backdrop.


 In most cases, cria are born without intervention, and usually during daylight hours. This allows the cria to dry off before evening. A cria normally weighs between 15 and 20 pounds and is usually standing and nursing within one hour of birth. Duchess Grey weighed 25 pounds at birth and now, at nine days old, weighs 29 pounds. She is very healthy! Cria continue to nurse for about six months until they have weaned. The gestation period is 11 to 12 months.


 People often confuse alpacas with llamas. While closely related, llamas and alpacas are distinctly different animals. Llamas are much larger, about twice the size of an alpaca, with an average weight of about 250 to 450 pounds. An alpaca’s weight averages 100 to 200 pounds. Llamas are primarily used for packing or for guarding herds of sheep, whereas alpacas are primarily raised for their soft and luxurious fleece.


Humming is the most common sound that alpacas make. The new cria, Duchess Grey, made tiny humming noises the day I photographed her. This is how alpacas communicate with each other. They also have excellent vision.


The new cria was certainly the main focus of the photo shoot but I managed to snap a few images of other alpacas as well. It was a very enjoyable day. Isn’t that what photography is about anyway? I think so!


Friday, May 15, 2020

A Closeup Look at Croatia

Submitted by Sheila Reeves

Alan and Sheila Reeves travel the world and capture amazing photographs of their adventures. Please enjoy this video from their 2019 trip to Croatia. Filled with wonderful images of the best of Croatia's natural world, they also captured the essence of life in this tradition filled country.


Wednesday, May 13, 2020

The Story behind the Photo - The Photograph Does Not Always Reflect the Circumstances

Submitted by John Humkey

One of my personal favorite photo's was taken decades ago with a 2 megapixel camera. I was happy with the sequence of seven images where a moth appeared on the flower and to have captured its quivering antenna in the process. However, at the time it was one of those blistering 108 degree days and I was sweating bullets into my burning eyes as I was crouched near the ground.

A reflection from a nearby billboard at the entrance to Covington Woods/Paul Walker golf course darn near blinded me and contributed to the copious amounts of sweat running down my face. A good number of bees were also buzzing all around probably attracted by the perspiration.
Wearing shorts and having bare legs, the kneeling on gravel contributed to my discomfort.

 I believe it was the single most uncomfortable and quickest photo I have ever taken. Even so, the new camera was also my first digital camera and it was my first good weekend available to get out with it. 

Sometimes, you just never know what you have until you can get home and take a look.

Tuesday, April 14, 2020

Shoot the Moon

Sitting around now for close to two weeks because of the Corona Virus quarantine trying not to get too bored, so thought I would use some of the extra free time to create another post. The time of year is approaching when we will again explore and photograph the night sky. One of the easiest night sky objects to photograph is the moon.

The moon to me is one of the most fascinating objects floating around up there. Growing up during the early days of the space race and the race to get to the moon, triggered a lifelong love affair with all things related to the exploration of this amazing realm. What is so great about the moon is that is so close and big and for a photographer, so bright. Photographing it is actually quite easy to accomplish, but if you have never given it a try, then there are a few things you might need to know about how to do so.

You do not need a whole lot of fancy astronomical equipment to get started. All you need is a digital camera, a telephoto or zoom lens, a cable/remote shutter release, and a tripod. With this basic setup, you can capture some amazing images of our nearest celestial neighbor.

As far as camera's go, just about any digital camera will work. However, with the lens you will need a telephoto or zoom lens somewhere between 300mm and 600mm. Most routine 70 - 300mm 'beer can lenses' will work just fine. If you are fortunate to own something around a 400mm to 600mm lense you will be the better for it. I use a Sigma 50-500mm f/4.0 - f/6.3 zoom lens and have gotten good results with it, but I have also used a lower quality Minolta 75-300 f/3.5 - f/5.6 lens with good results. The rule is, just use the biggest lens you have.

A wireless remote or cable release is really a good thing to use as well because it helps to prevent vibrations that can blur your shots. In a pinch you can use the 2 second self timer to accomplish the same thing.

You do not need a high dollar tripod, but it does need to be sturdy enough to handle the lense you are using. Some of the bigger zooms are quite heavy and require a tripod with some beef to it to hold it steady.


So, how do you capture the moon? Well, contrary to popular belief, a full moon is not the best time to photograph it. Certainly under certain circumstances the full moon offers some amazing opportunities, but the moon is filled with all kinds of craters and mountain ranges than require shadows to be able to see them in detail. A full moon most often will washout the details. The best time is during one of the crescent phases when there is a shadow or terminator falling across part or most of the moon's surface. This also offers a wider variety of opportunities as the texture of the moon changes as the terminator moves across the surface.


However, should you desire to photograph the full moon, the best time is to catch it just after it rises above the horizon right at dusk. When it sits low in the sky, two things can happen. First it will take on a deeper richer color and can be almost red at times. This is because the light reflecting off it must travel through more of the atmosphere which imparts a yellowish or orange tint to it. Secondly, you can also include some of the natural world that may be found along the horizon like tree lines, or buildings, or mountains, or whatever. This can add a great deal of interest and context to you image.

Shooting the moon during a lunar eclipse can be one of the best times as the moon will slowly progress through a wide variety of colors and textures.


As far as exposure. There is no one way to accomplish this, but there are a couple of things you need to know. First of all, you should take your camera off AUTO for this can cause you all kinds of issues. You can shoot in Aperture Priority, but even this sometimes requires a lot of exposure compensation. The best way of course is to shoot in Manual Mode.


Another thing to remember is to use what is called Spot Metering instead of Matrix or Evaluative metering. Spot metering is where you set your metering mode to use a single point of reference in the field of view, usually the center point. This way you can meter directly off the brightest part of the moon. Matrix or Evaluative metering will get confused by all the darkness surrounding the moon and cause the camera to over expose the moon. By spot metering on the moon itself, you will achieve a much more accurate exposure value.

So here is what I do most of the time. I will use Manual Mode. I set my White Balance to Daylight, I set my ISO to 100. I set my Aperture to f/8.0ish most of the time, and I start with a shutter speed of 1/250th of a second. I find the moon using a smaller focal length like 200mm or something similar, then I zoom in to the maximum...in my case 500mm and center the moon in the viewfinder, focus then I lock the tripod head, wait for a few seconds for any vibrations to dampen, then using a cable release fire off a couple of shots. After looking at the results I may alter the exposure up or down.
Once I obtain the results I want, I load them into the computer and apply a small amount of post processing.

Photographing the moon is an easy way to break into photographing the night sky. It's easy, can be done virtually anywhere, and the results are always rewarding.

Thursday, March 12, 2020

Using a Birding Hideout to Capture Fine Art Quality Backyard Bird Images

Submitted by Keith Bridgman

It was an ordinary tree limb about an inch or so in diameter lying on the ground with a graceful arch extending across and above the ground. Along its length a few smaller branches poked out here and there at random places. A  background of crossing brambles lay about thirty feet or so behind and caught the full sun. Around the arching tree limb were placed several cedar stump-like logs and other assorted greenery along with rustic looking logs to provide a sampling of natural habitat foliage. Here and there black sunflower seeds we scattered placed at strategic locations to attract the myriad of songbirds that made this small corner opening at the edge the woods home. Before long, a brilliant crimson Northern Cardinal landed on the limb and raised his crown as if to proclaim this perch as his own. I moved the camera slightly to my left, focused on his eye, then recomposed and fired off a series of images. The resulting final image could possibly be the single best bird photograph I've ever taken...all made possible by shooting from inside the confines of a simple birding hideout.


Birding is a hobby I've casually pursued off and on for many years. I have a decent bird sighting list I've kept up...sometimes, however, I've never seriously attempted to photograph these fascinating feathered friends until recently. Mostly I've just taken snap shots and spent time afield watching them, except on rare occasions.

My wife Kris has been the bird photographer in the family using a simple point and shoot zoom camera, she has captured some amazing photographs just by shooting them from the deck or through the bedroom window while they use the bird feeders. She and I both wanted something more, something that might offer the opportunity to not only see a wider variety of birds, but to capture them in their natural habitat. So I was prompted to construct a simple bird hideout.


Okay...I'll admit it...I sort of over-constructed this thing, but I wanted something that was semi-portable, yet substantial enough to provide not only a good hiding place for bird photography, but something that would provide a element of weather protection. It's not waterproof, but does protect from the cold winter winds.


Commercial blinds are available and they work quite well and are designed to be portable. In many cases all that is required is simply something bland to sit behind to disguise your movement. The idea is to reduce the distance between the camera and the subject thus making it possible to capture more detail and to allow the birds to act in their normal manner. I constructed this one using an old studio backdrop as the main covering, then covered it with two strips of brown burlap which I painted in a camo pattern using flat black and flat brown spray paint. The main covering was simply draped over a rope that was tied between two trees and then staked down at the corners to create a type of A-frame tent-like structure. The burlap was simply draped over it and held in place by using short pieces of twine to tie it together. I also used a couple of long branches wedged into the ground and extended outward to "inflate" the material from the inside to provided for more head room.

I covered the ground inside the blind with a thick layer of straw, to prevent it from becoming too muddy, and placed two short, about three inches tall, wood platforms to sit on. Holes were cut at strategic locations to allow for the camera lense to look through. The idea here is to be able to see and capture the birds at close to eye level...on the same plane...without looking down or up to them. This helps to isolate the birds against a suitable background and give the images a more intimate appeal.

About five yards or so in front of the hideout I placed a series of natural props including cut logs, natural logs, tree limbs, greenery, and other assorted things for a feeding area. The idea is to be able to change it up from time to time...add to it, remove things, re-arrange, that sort of thing to maintain a fresh look. It's also important to provide perching locations near the feeding station as the birds tend to briefly stop on perch's to make sure it is safe before dropping onto the feeding area. I've added to and modified my setup numerous times since the first installment.

Just as important as the props is the background which should be several yards behind and provide a solid yet diffused assembly of natural foliage. Treelines, brambles, bushes, brush piles, dirt mounds, a distant hill, a shaded area, just about anything natural will work, it just needs to be separated several yards from where you want the birds to land. You will also want the prevailing light to come from behind you in most cases. As with the props, you can get creative with the placement of your hideout to best take advantage of the light. In the summer, the area I use will also have a natural growth of wild flowers which will enhance the scenic value of the birding photo opportunity.


As far as attracting the birds, I use black sunflower seeds mostly which can be purchased at any location that sells birdseed, but I also use peanut butter mixed with ordinary birdseed to make a kind of suet that is wedged into small holes drilled into the props. Things like Mill Worms and fruit rinds also work and will attract a wider variety of birds and possibly other kinds of wildlife in the long run. Woodpeckers especially like old semi-rotting limbs that harbor insects and such, so by hanging them onto longer limbs wedged into the ground like a pole, you enhance the ability to attract those fascinating birds. You can even toss out some "road-kill" to attract birds like vultures and possibly even birds of prey. It can sometimes take a few days even up to a week for the birds to find the offerings and get use to the blind being there, so be patient.

Shooting from a birding hideout offers a tremendous opportunity to capture high quality, fine art level photographs of songbirds. The type of equipment to use depends a great deal on your budget, but realistically you will need a zoom or telephoto lens, something in the range of 300mm to 600mm. A typical 70 - 300 zoom lens will work pretty well. Having something that reaches out to 400, 500, or 600mm will simply allow you capture more closeup detail. You will also want to shoot using as fast of a shutter speed as you can. This of course depends on the light and f/stop of your lens. The f/stop also plays an important role. A relatively large opening like f/4 allows for nice blurring of the background, but it also reduces the depth of field making focus all the more important. I tend to shoot around f/6.3 to f/8.0 which at 500mm will still give a nice blurring to the background but allow for a bit wider depth of field and sharper focus. Pushing the ISO up to 800, 1600, or higher will allow for faster shutter speeds but it also generates a greater amount of digital noise, so it's a bit of a trade-off. Just experiment with your camera until you feel comfortable with its capabilities. Shooting from a tripod certainly helps to capture clear and sharp images. There is even opportunities to shoot video footage of your backyard birds.


Focus is also important. You should always focus on the eye of the birds using single point focus. Most cameras allow you to move that single focus point around to aide in composition, but simply using the center point as the focus point, you can easily recompose or crop your image to obtain the result you want.

So there you have it, in a nutshell, using a birding hideout can certainly provide a great deal of enjoyment and an often welcomed change of pace for your photography. Hope you can give it a try.


Monday, February 17, 2020

Alan and Sheila Reeves’ Tanzanian Safari

Submitted by Sheila Reeves


Hot and tired from fending off a dozen hyenas and half that many jackals from its buffalo kill, the big male lion plopped down in the shade created by our safari vehicle. Flies crawled over his face, congregating especially in the corner of his eyes and nostrils. His heaving body was about 10 inches below the open window. There was a temptation to reach out and pet him.


This is Tanzania!

After 23 hours of travel, we set out on an awesome adventure with Steve Gettle Photography and Mazingira Safari Tours! (The day before the trip, Steve Gettle’s father died. He and Nicole Suddeth joined us for the last 4 days of the safari.)


There were eight photographers in three vehicles. In addition to the windows, the entire top of the safari vehicles lifted up about 2.5 feet, so that cameras could shoot above the vegetation.


After several hours of sleep at Rivertrees Lodge, we had breakfast and departed for Tarangire National Park. Tarangire is known for its large herds of elephants as well as the variety of plains animals and birds. It 
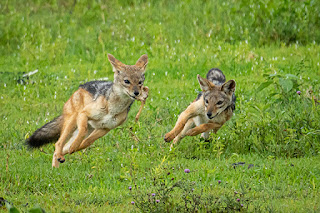
did not disappoint! On the first game drive we saw elephants, giraffes, a leopard, a dik-dik, impalas, jackals, baboons, mongooses, monkeys and warthogs, as well as lilac-breasted rollers, red-billed hornbills, yellow-billed hornbills, magpie shrikes, fish eagles, Egyptian geese, Orange Bishops, Superb Starlings and more! 


We spent most of two days in the field before checking in at the Tarangire Sopa Lodge (elevation:5000 feet). We caught our first glimpse of Hippos, as well as impalas, waterbucks and Thompson’s Gazelles (Tommies).

Then, we headed out for another morning game drive in Tarangire National Park before driving along the wonderful scenic route to Ngorongoro Crater. It was a very muddy, rainy, scary drive!

We arrived at Ngorongoro Sopa Lodge (elevation: 7000 ft), our home for the next three nights. The next morning, we descended 2000 feet into the crater for an all-day game drive. We saw a wide variety of wildlife that call the crater home: lions, zebras, elephants, gazelles, wildebeests, warthogs, hyenas, cape buffalo, jackals, and an abundance of bird species. The crater is actually a caldera formed when the volcano collapsed.


Then, we headed for the Serengeti, enjoying a game drive along the way to the Ndutu Safari Lodge (elevation: 5300 ft). We would call this lodge home for four nights.


In the Serengeti, we were able to go off road! We left before sunrise on Friday, January 31st and enjoyed a safari breakfast in the bush. We spent three long days exploring this area. One of the highlights was having a meal in the field surrounded by thousands of wildebeests and zebras. The animals did not come close when we were out of the vehicles, but every direction we looked, they lined the horizon. Another highlight was coming upon a newborn wildebeest. Our drivers/guides told us it was probably just an hour or two old. When we first stopped to observe, the baby was standing on wobbly legs, but in a few minutes, it was walking, and a few minutes later, it was running. The babies need to be able to keep up with the herd within hours of birth.


We left Ndutu, and enjoyed another game drive as we travelled to the Ngorongoro Farm House, where we arrived for lunch. It was pouring down rain when we arrived. January and February are supposed to be the dry season in this part of Tanzania. But this year, it had rained at least a little EVERY day since October. There has not been a dry season. The only day of our trip with no rain was the day we left.


On our last day in Africa, we packed up for our return home. We drove to Arusha where we had a leisurely lunch at Jacob’s home, prepared by his wife. After lunch, we spent a few hours at the Cultural Heritage Centre in Arusha before heading to the airport for a very long journey home!

The lodges were all very nice. We had plenty of food. The driver/guides were competent and extremely knowledgeable. We felt well cared-for. We saw some amazing sights and took some really fun photographs. It was a grand adventure!

And if electricity, hot water, and Wi-Fi were in limited supply? Well, that is Africa!